Starting a garden is easy when you have ample outdoor space and a shovel. But planting in raised planter boxes is better. Yes, there’s DIY construction involved, but raised bed gardening has several good points. Plus, tending to clean rows of thriving flowers and vegetables is way more satisfying. This guide should show you the ropes and make this garden project easy.
Why Build Raised Planter Boxes
A raised bed is a freestanding frame without a top or bottom. It’s perfect for growing veggies or flowers, especially when filled with organic soil and positioned in a sunny area. But why spend time building one when you can directly plant to the ground? Here are some reasons why:
- Gardening becomes more comfortable. With elevated garden beds, there’s no need for you to kneel or bend while tending to your plants. Now even the elderly can enjoy gardening without breaking their backs!
- Weed control is easier and faster. Pesky weeds cannot get to your raised wooden planter box and compete with soil nutrients. And if they do sprout on your garden beds, they are easy to spot and pull out.
- The frame protects your growing crops. It doubles as a barrier to garden pests like snails and slugs. The sides also protect the soil from flooding and erosion, especially during the rainy season. Above-the-ground soil also warms faster and has better drainage, allowing you to grow more and plant sooner.
- Plants grow better together. Filling your wooden planter box with quality soil means your plants get concentrated nutrients to grow tall and produce more. It also means you can start a garden despite your rocky, weed-filled or dry backyard. Gardeners also find this method ideal for companion planting.
- Raised garden beds suit smaller spaces. Conventional gardens often lead to wild and unwieldy crops. With raised planter boxes, you can control plant growth and ensure every crop gets equal attention.
Easy Steps to Build Raised Planter Boxes
The easiest way to start raised bed gardening is to purchase commercial kits. The problem is these can be expensive. Your DIY know-how and this step-by-step guide are your best bet for low-cost gardening. First, here are the tools and materials you’ll need:
| TOOLS | MATERIALS |
| Miter saw | Pallet wood |
| Drill, bits and exterior screws | Weed mat and/or heavy-duty plastic |
| Hammer and nails | Potting mix |
| Spirit level | Seeds or seedlings |
| Staple gun and staples | |
| Tape measure | |
| Garden shovel or fork and gloves |
1. Pick and prep your location
The best location for your raised planter boxes is somewhere with full sun for 6 to 8 hours. Pick a levelled ground site, but avoid low or marshy spots. Steer clear of windy or frosty areas, too. And unless you decide to build a wicking or self-watering planter, position your wood boxes near the hose and your house for easy watering and harvesting.
Mark your chosen garden spot and free it from grass and weeds. Next, use a garden shovel or fork to loosen the soil, remove rocks and check for roots. This prep ensures good drainage and moisture retention. You also get to eliminate any competing crops.
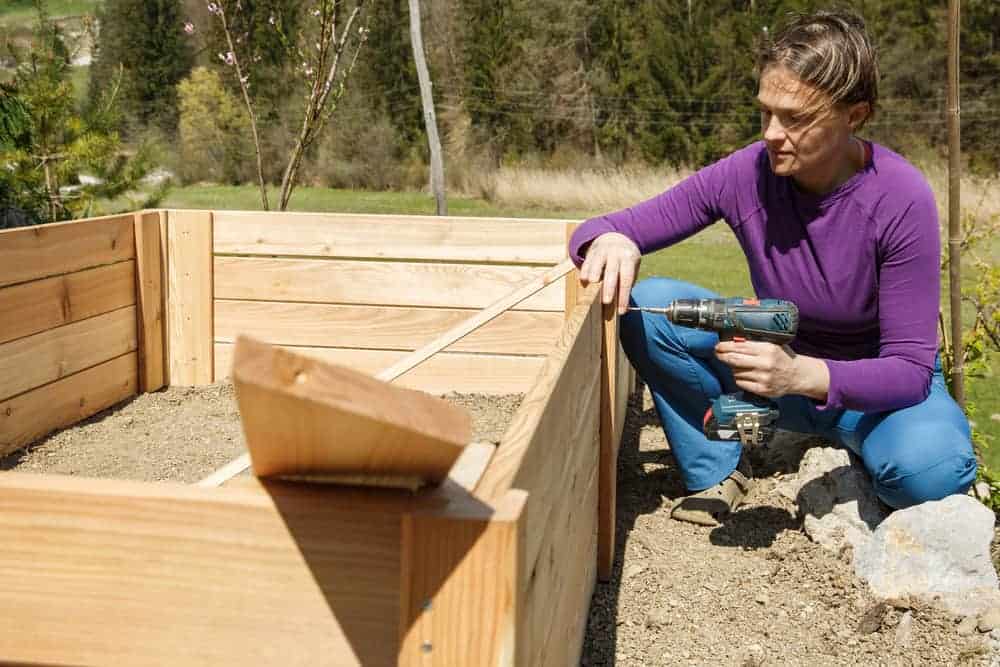
2. Build your wooden plant boxes
You need about eight long slats and four short vertical supports for your raised planter boxes. The bed design and size are up to you and your available backyard garden space, though. So, I’ll be listing down the basics for an easy, no-frills garden bed, but feel free to modify.
- Measure and cut your wood slats to size. Join the long slats and supports using screws or nails. Use a spirit level to keep everything even.
Wood type: Ideally, use cedar, juniper or redwood as it is rot-resistant. But you can also use alternative materials like upcycled pallets, concrete blocks or stones.
Width: Make sure your raised garden beds are no wider than 1 metre, though. This way, you can reach for the bed centre without stepping on and compressing the soil.
Length: You can, however, make the garden beds as long as you want. Just add vertical support or stake for every metre to prevent bowing.
Height: Your raised garden beds can be as high as 91cm, but 28cm is the most ideal. Keep in mind that this spec relies on the crop you want to grow and its recommended soil level or depth.
- Staple weed mat at the bottom of the frame. The mesh hardware cloth will prevent weeds from getting to your plants but still allow worms to enrich your soil. If you’re not using rot-resistant wood, cover the inner wood frame with plastic as well.
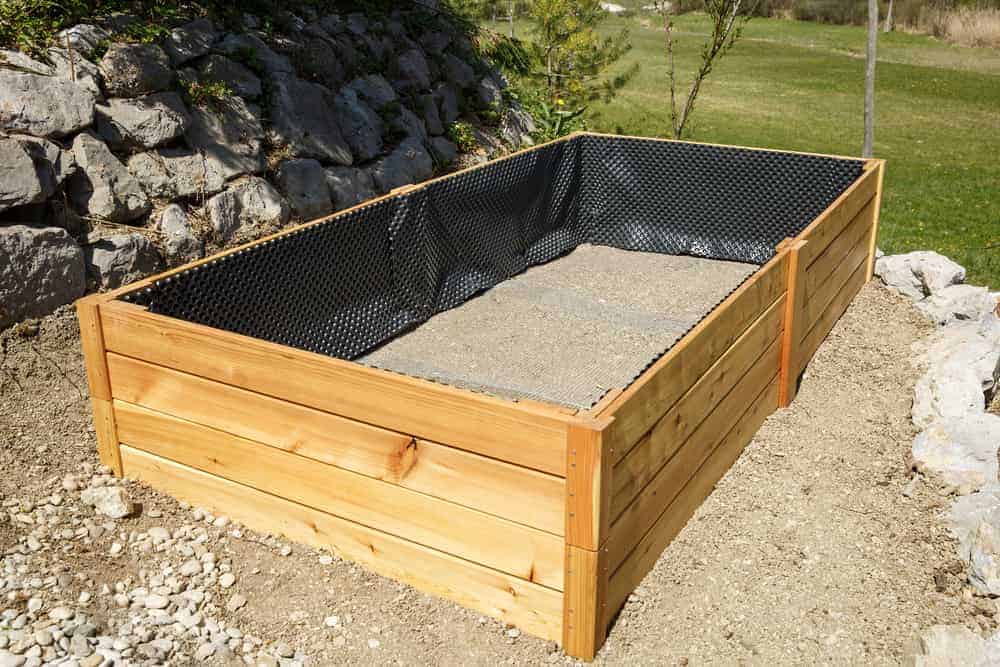
3. Fill your raised planter boxes with garden soil
Position your finished wood frame on your prepped location. Now, you can fill the garden bed with soil from your yard. But it’s probably best to start fresh and prevent weed growth by using a high-quality potting mix.
You can ask your garden store personnel for advice about this. But a good option is to combine one part screened topsoil with one part compost. Some also combine compost with peat moss and vermiculite. Whatever you choose, make sure it matches your crop.
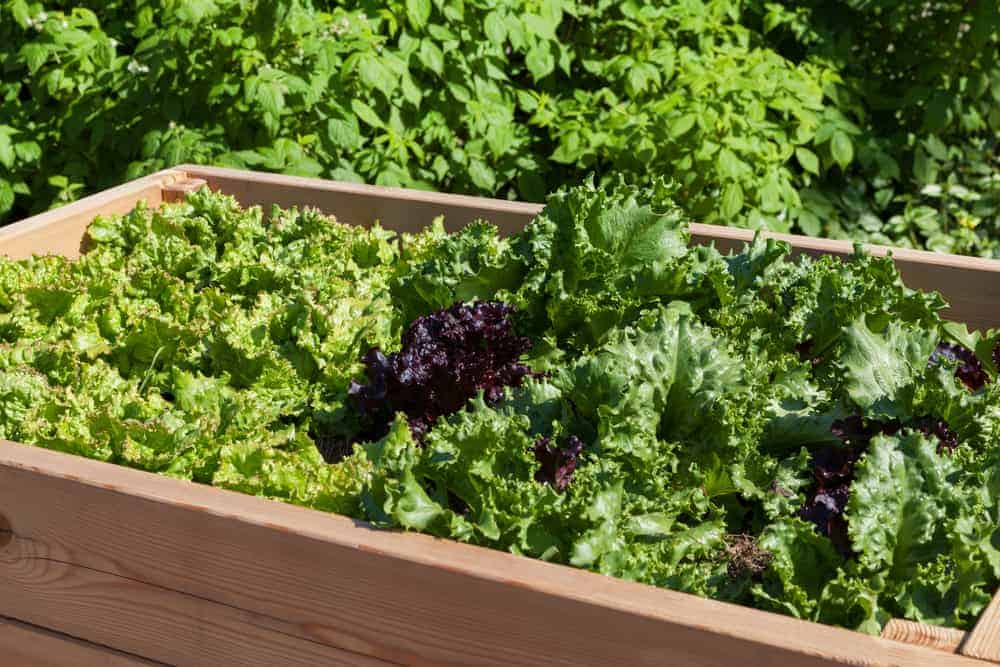
4. Start planting!
It’s time to enjoy the best part of raised bed gardening, other than harvesting, of course. Divide your garden bed into rows. Then put your chosen crop on each planting hole and backfill. Keep the soil loose to let water drip down the roots.
I’ve mentioned that your choice of crops should depend on the bed height. Big plants naturally need more room to grow, while small plants can thrive even on shallow beds. Here’s a table of some popular crops and their ideal soil depth to help you choose and decide:
| Plant Type | Shallow (15 to 45cm depth) | Medium (45 to 60cm depth) | Deep (60 to 90cm depth) |
| Herbs | Basil, chives, cilantro, dill, lemongrass, mint, oregano, parsley, tarragon, thyme | Borage, lavender, rosemary, sage | |
| Fruits | Blueberries, strawberries | Cantaloupes, muskmelons | Tomatoes, watermelon |
| Vegetables | Arugula, Bok choy (kohlrabi), broccoli, Brussel sprouts, cabbage, cauliflower, celeriac, celery, Chinese cabbage, collard greens, corn, endive, fennel, garlic, ginger, lettuce, leeks, mustard greens, onions, potatoes, radishes, scallions, shallots, spinach, turmeric | Beans (fava, pole and snap), beets, carrots, chard, cucumber, daikon, eggplant, kale, peas, peppers, rutabagas, summer squash, turnips | Artichokes, asparagus, lima beans, okra, parsnips, pumpkins, rhubarb, sweet potatoes, winter squash |
Aside from soil depth, make sure to check the spacing instruction from your seed packet. Then top the base of your plants with sufficient mulch. And for your finishing touch, add plant tags as well.
5. Maintain your raised bed garden
Like any traditional garden, your raised beds need pruning, weeding and watering. Make sure to fertilise them with compost and replace decomposed mulch when needed. And if your plants somehow attracted harmful pests, eliminate them with these DIY garden sprays.
Keen to try other gardening projects? Vertical gardening with pallets and plastic bottle gardens are just as easy!
