The kitchen sink is your best friend every wash-up time. But one greasy pot after another can take a toll on your cleaning partner, leaving it grimy and dull. So, why not treat it to deep cleaning once in a while? Here are quick steps to polish a stainless-steel sink using homemade cleaners. Make sure to follow these up with our care tips to keep it looking new!
Steps to Polish a Stainless Steel Sink
Cleaning stainless steel sinks is easy when you have the right tools. And while you can always use store-bought cleaners, homemade ones cost less and are just as effective. Before doing all that scrubbing and washing, make sure to have these ready:
- Cleaning tools like a soft sponge or fine steel wool, spray bottle, old toothbrush, microfibre cloth, paper towel and a small bowl
- DIY kitchen sink cleaners like baking soda, dish soap, white vinegar, lemon, cream of tartar, hydrogen peroxide, oil, plain flour and water
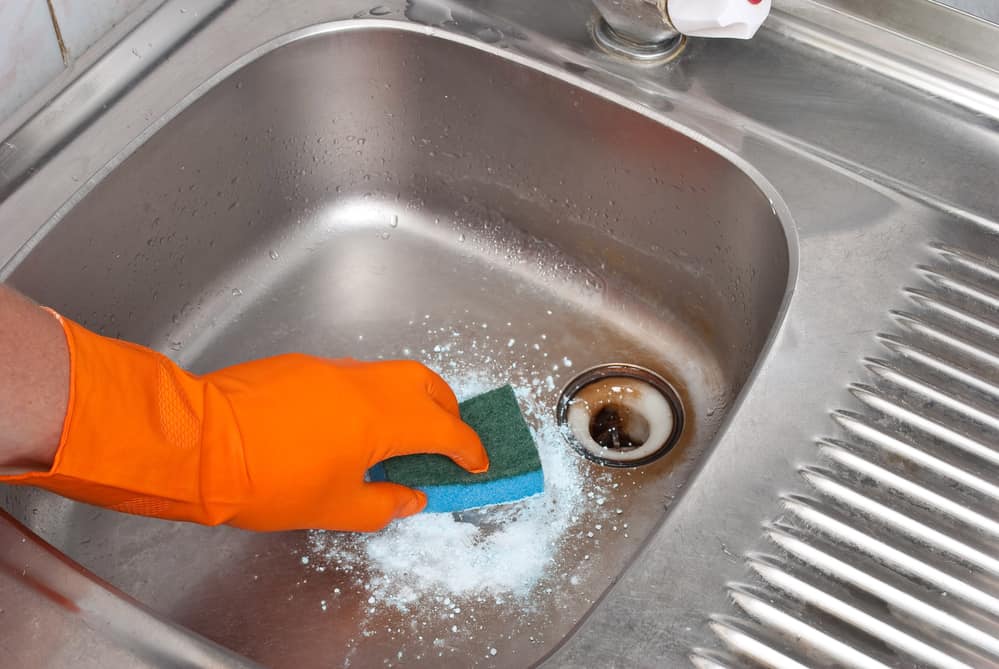
Once you have your cleaning gear ready for battle, clear off your sink area. Put away your washed plates or glasses, then empty the drain of any food residue. Put on your rubber gloves. Time to do some cleaning and polishing!
Sprinkle baking soda to clean off stuck-on grime.
The first step will be to remove all visible dirt stuck on your stainless steel sink, particularly the area near the drain. Baking soda is the best cleaner for this job. Here’s how to make it work:
- Plug the sink then fill it up with a small amount of water (about 1cm).
- Sprinkle baking soda all over your sink. You can also squirt some dish soap if you want.
- Start scrubbing using a soft wet sponge, concentrating on the dirtiest spots. As you clean, baking soda and water will turn into a paste-like mixture, which works as a gentle abrasive that will not damage the sink surface.
Tip: Alternatively, you can mix the baking soda with a bit of water in a small bowl to create the cleaning paste. Dip your wet sponge into the mixture and start scrubbing. For hard-to-remove dirt, you can use fine steel wool instead. Make sure to follow the stainless steel grain to prevent scratching.
Use vinegar or lemon for limescale removal.
To loosen all that dirt further, we’ll have to activate the baking soda with an acidic ingredient. Fill up your squeeze bottle with some white vinegar, then spray it onto your sink. Let it fizz for a minute or two. If you have limescale build-up around the faucet area, dip an old toothbrush to your solution and use it for scrubbing. The fine bristles should have no trouble getting into those tight spots that a sponge can’t reach. When you’re happy, pull the plug, rinse your sink and wash all that residue away.
Tip: If you don’t want the smell of vinegar filling up your kitchen, you can replace it with a halved lemon. The acid on the fruit can create the same bubbling effect with your baking soda paste while doubling as a scrubber. It has anti-bacterial properties, too, and gives off a fresh citrus scent. If you have 70% isopropyl alcohol on hand, this can also remove those white crusts on your sink and faucet. Use it with a soft cloth to wipe the area or spray it on before wiping.
Buff surface with cream of tartar to remove stains and scratches.
If scratches are making it difficult for you to polish a stainless steel sink, let the cream of tartar come to your rescue. It works wonders on removing tough stains, too. Here’s what you need to do:
- Combine cream of tartar and 3% hydrogen peroxide with a 3:1 ratio.
- Rub it on the troublesome area using a soft cloth then let it dry up for a few minutes.
- Use a wet sponge or cloth to wipe.
- If you prefer, you can sprinkle the cream of tartar on the scratched surface, use the cloth to buff, then spray it with hydrogen peroxide. Rinse the sink with water.
Tip: Do you need more help in removing tough kitchen sink stains? This article has the tricks you need to tackle stains on your stainless steel and porcelain sinks.
Polish with oil or flour.
We’re almost to the finish line! Time to make your kitchen sink sparkle. Start by wiping it dry using a clean cloth or towel. Then, use either of these techniques to polish a stainless steel sink:
Flour
- Dust your sink with plain flour. This ingredient surprisingly works well as a stainless steel polisher.
- Use a soft cloth or paper towel to start buffing. Move your hand in circular motions, as if you’re waxing your car. Make sure to rub the handles, knobs, drain and sides as well.
- Wipe your sink clean, step back and admire your gleaming handiwork.
Oil
- If you prefer to save the flour for baking, you can use olive or baby oil instead.
- Pour a small amount of oil onto a soft dry cloth and rub it all over your sink.
- Wipe any excess oil with a clean rag and voila! Admire your now sparkling stainless steel sink.
Keep Your Stainless Steel Sink Clean and Shiny
Now, you don’t want all that hard work to go down the drain. These tips can help retain the shine of your stainless steel sink or at least make the next clean-up easier.
- Clean your sink after every use to prevent grime or limescale build-up.
- Avoid soaking your greasy dishes in the sink for a long time as they can leave a grimy coating. If you need to soak your pots and plates, add some dish soap to your water to make food residue easier to wash away.
- If using DIY kitchen sink cleaners, give them some time to work their magic. Let the mixture sit for a few minutes to break down dirt and grime.
- Polish a stainless steel sink with a microfibre cloth as it has the best texture for polishing smooth surfaces.
- Don’t leave your sink drain behind! A shiny sink is pointless if it stinks. Make sure to flush it out with a drain cleaner. Or, if you want to stick to homemade solutions, sprinkle the drain with a cup of baking soda. Pour boiling water into the drain and let it sit for a few minutes. Add some more baking soda then flush with white vinegar. Let it stand for a few more minutes before washing away with boiling water.
